It’s January and, in the UK at least, that means it’s wet, cold, windy, boggy and generally not nice. However, while it may be one of the quieter months in the year, there are always things to do at the allotment!
Here are 10 must do tasks to do this month:
1) Get Started – Cleaning up
It’s a new year and it may even be a new allotment. It’s critical that you start as you mean to go on and make things easier for yourself during the busier months.
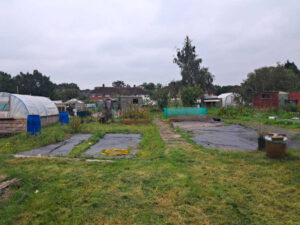
If this is a new plot for you, there’s likely to be quite a bit of mess to clear up. Even if it’s not, the remnants of last year’s crop may still be lingering. Time to get it all up, out and on the compost heap. It won’t take anywhere near as long as you’re imagining and everything else will seem a lot easier once it’s done, so get at it already!
2) Maintenance and Repair
From leaky sheds and broken greenhouses to blown over polytunnels and damaged raised beds, this quieter time is the ideal time to patch up, repair and replace.
Braving the cold and wet now will add to the effect of number 1 in making everything else seem that bit more achievable and will, of course have things looking good. Having everything working as it should on month one will provide some momentum for the rest of the year; a dry shed will keep your equipment clean, dry and in good working order, raised bed walls will keep your soil where it needs to be and anything else in good working order will save you a job and a headache at a later date.
3) Crop Planning
There’s a busy year ahead awith lot’s to sow, plant and harvest. This calls for some planning.
The most important decision you need to make is what you want to grow. It sounds obvious, but the temptation to grow everything you can often gets the better of us and this can lead to having far too much of several crops neither you, your family or your friends will eat.
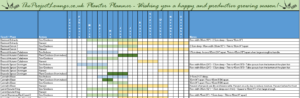
Next, take a look online or buy a planner. A proper allotment planner will advise what months you can sow, plant indoors / outdoors and harvest each crop. If your planner doesn’t have a particular crop that you’d like to grow, you’ll have to do a bit of research and add your new knowledge to it.
Now that you have a basic plan, it’s time to add some detail. If your plan advises there’s a harvest window for a particular crop of 3 months, it means you’ll need to spread your sowing and planting over a similar amount of time to avoid under / over ripening.
4) Buy your seeds
Now that you know what you’d like to grow, it’s good time to buy any seeds you need. Buying early or late in the year usually means cheaper prices and allows plenty of time for delivery.
Before buying, have a check through your stock to enxure you’re not over purchasing. Seeds don’t last forever, so it’s best to only order a little more than you need.
It’s recommended to stick to reputable suppliers, but it’s well worth experimenting with some alternative suppliers if you can afford to lose the gamble.
5) Plan the beds
So, you know what you’ll be growing and the seeds are on their way. It’s time to make plans for the spaces in which you’ll be growing them.
Many of us are, by nature, creatures of habit. However, growing your crops in the same soil every year gives pests and diseases a chance to become established. Therefore, it’s essential to rotate your crops each year.
There are various rotation practices, but a nice a simple approach groups crops into three categories: potatoes, brassicas and everything else.
What are Brassicas?
Brassicas are a group of vegetables from the same family and, therefore, are all suceptible to the same pests and diseases. The family include: Radishes, Kale, Turnips, Choy, Cabbage, Cauliflower, Broccoli, Brussel Sprouts, Water Cress and Mustard Greens (and a few others) .
Three different groups means a three year cycle:
| Year 1 | Year 2 | Year 3 | |
| Bed Group 1 | Brassicas | Potatoes | Everything Else |
| Bed Group 2 | Potatoes | Everything Else | Brassicas |
| Bed Group 3 | Everything Else | Brassicas | Potatoes |
A useful tool to help with planning your beds is Google Maps. You can find your allotment, activate the satellite layer and take a screenshot or snip. You can then use this to number your beds and make more detailed plans. Of course, a pen and a piece of paper can also
Once this planning has been completed, it’ll be a simple case of following it each year.
6) Prepare the beds
With a plan in place, you can now ensure the beds have the everything needed for your crops to flourish.
Preparing your beds early in the year give time for manure to breakdown and fertiliser and nutrients to distribute through the soil.
There’s lots to consider when preparing the beds and it’s up to you how far you take this. You can conduct specific research on each crop to and buy the perfect fertiliser, or you can take a more general approach. I think it’s wise to, at least, start wwith a more general approach.
Adding manure to a bed will add key nutrients to and increase acitiy of the soil. Some crops, such as potatoes, prefer the increased acidity, but others, such as brassicas, prefer a more neutral environment. Where soil is too acidic, lime can be added to bring it closer to neutral levels. This means we can use our rotation plan to form a basic soil treatment plan:
| Year 1 | Year 2 | Year 3 | |
| Bed Group 1 | Add lime | Add manure | – |
| Bed Group 2 | Add manure | – | Add lime |
| Bed Group 3 | – | Add lime | Add manure |
As well as preparing the soil, it’s a good time to prepare any supporting structures.
7) Prune your trees
Apple, pear and quince trees, which are common amongst allotment owners, are generally best pruned in the winter when they are dormant. Pruning can prevent disease from taking hold, allow good air flow and sunlight penetration and encourage new growth.
It’s recommended to prune these trees between November and March, so a quieter month like January is an ideal time to get started.
You should aim to remove no more than a third of branches and aim to reduce branch density. Particular effort should be made to remove branches that cross one another, as well as any branches that are showing signs of damage or disease.
8) Sowing and Planting
While it is early in the season, a head start can be made by sowing the following seeds indoors (either at home or in a slightly heated greenhouse):
- Leeks
- Cayenne Chillis
- Cauliflower
- Onions
- Cherry tomatoes
9) Harvesting
Of course, if any of your crops from the previous season remain, it might be the right time to harvest them. These crops could include:
- Beetroot
- Swedes
- Brussels Sprouts
- Spinach
Of course, depending on the weather and the times things were planted last year, there could be other crops that are perfectly fine to harvest in January.
10) Research
Now everything’s done for January, you’ll want to do everything you can to ensure your efforts pay off. With the internet at your fingertips, it’s well worth reviewing your plans and conducting some research specific to your circumstances.
It may be worth looking up:
- What fertiliser is best for each crop
- What risks you face in terms of pests and disease and how you can take pre-emptive steps to mitigate them
- How much water each crop needs
- How to tell when a crop is ready to harvest
- How to store harvested crops
- How to cook / prepare your harvest
Bonus – Make a diary
There’s one key tip that I definitely recommend and you get this as a bonus for making it through the list! That tip is to make a diary.
In this diary you should note:
- The seeds and plants you’ve ordered, when and where from
- When you’ve sown each seed type, whether indoors or outdoors.
- When you’ve planted each plant type
- When you’ve harvested each crop
- Any methods or practices followed (particularly if it’s something you’ve experimented with)
- Any learnings / things you would do differently next year
Of course, if you already have a diary, now’s a great time to review last year’s activities and decide what improvements you’d like to make this time around.
Congratulations!
Well done! If you’ve been able to complete the above tasks, you’ve maxed out what you can do in January and you’ve got the year off to a flying start.
If there’s anything you’d add to this list, anything you disagree with or if you have any successes you’d like to share, please do leave a comment below. Alternatively, follow the Project Lounge Facebook Page where you can leave feedback and be the first to know of any new posts as and when they’re published.
If you’re interested in learning more about growing your own, or are interested in discovering new hobbies, check out the home page to find more interesting and educational posts.