Why it’s important to understand the basics of Arduino coding
It’s an all too common sight on the forums and Facebook groups to see people who are copying and pasting code into their Arduino projects expecting things to ‘just work’. For their first projects and experiments, they’re probably not disappointed. They may copy an entire project, circuit, code and all and they may well find that all works as expected. However, when they want to add a new feature or make a tweak, that’s where things start to break.
This introduction is going to span at least two posts. In this post, we’ll explore a little more about how the code is processed before it reaches your Arduino and we’ll break down the blink example sketch to understand exactly what’s happening. Finally, we’ll run a few experiments to bring our learning to life.
In the next post we’ll discuss libraries and we’ll use the Serial library. This will give us an insight into what logic is taking place inside your Arduino while code runs and enable us to explore different types of variable.
Future posts will look at reading inputs, avoiding using a function called delay (we’ll learn more about that below), and writing our own functions.
Prerequisites
I’ve written this post so that you can follow along. To do so, you need to have an Arduino connected to your computer and the Arduino IDE installed and set up. The following posts will help you to achieve this:
- Getting started with Arduino – Choosing your first Arduino
- Getting Started With Arduino – How To Install Arduino IDE, Set Up and Upload Code
What are Arduino pins?
Look around the outside of your board. You’ll either see a set of holes or pins where wires can be connected. Most of the pins will have numbers printed beside them. When you send code to your Arduino board, you’re telling it how and when to use those pins. At the highest level, pins are set as output pins or input pins. Output pins can be set to either on (+5V) or off (0V), and in some cases, a specified level in between.
From screen to Arduino – What happens to your code?
To fully understand the code we see in Arduino sketches, it’s useful to understand what happens behind the scenes when we send a code sketch to our Arduino boards. As you may already be aware, there are thousands of coding languages and they can normally be split into two groups, Interpreted and Compiled.
All code (unless it’s already machine code) must be converted to a language the system it’s running on can understand.
Interpreted languages, such as Python, are converted line by line as the code is executed. As you might imagine, this is extra work for the system to do.
Compiled languages, such as C++, are converted to machine code before they are executed. While this does mean there’s a delay before projects are ready to be read by the system, it also means the system can read it much more quickly and efficiently.
Arduino uses a C++ based language, so sketches must compiled (converted to machine code) before they’re uploaded to our boards. The delay to compile is usually a very short time because sketch file sizes are relatively small. The benefit we get for that delay is that the Arduino board can run through our code fairly quickly with relatively low powered components.
The Blink sketch
Blink is usually the first code you run on any hardware as a proof of everything working and being in a position to write further code. It’s the “Hello, world” we might be familiar with from text based systems for hardware programming.
In the Arduino IDE, it’s found with many other example sketches under File > Examples > 01.Basics > Blink.
Open the example and connect your Arduino board. Click the right arrow at the top left of the IDE screen to compile the code and upload it to your Arduino.
While your Arduino is blinking it’s light, let’s look at the code and see what’s going on:
Code before the main functions
/*
  Blink

  Turns an LED on for one second, then off for one second, repeatedly.

  Most Arduinos have an on-board LED you can control. On the UNO, MEGA and ZERO
  it is attached to digital pin 13, on MKR1000 on pin 6. LED_BUILTIN is set to
  the correct LED pin independent of which board is used.
  If you want to know what pin the on-board LED is connected to on your Arduino
  model, check the Technical Specs of your board at:
  https://www.arduino.cc/en/Main/Products

  modified 8 May 2014
  by Scott Fitzgerald
  modified 2 Sep 2016
  by Arturo Guadalupi
  modified 8 Sep 2016
  by Colby Newman

  This example code is in the public domain.

  https://www.arduino.cc/en/Tutorial/BuiltInExamples/Blink
*/

// the setup function runs once when you press reset or power the board
The first part of this code contains a multiline comment. Comments are pieces of text left ot provide details of the sketch and to help anybody reading the code to understand what’s happening. As the name suggests, multiline comments span multiple lines. Anything after /* and before */ is seen as a comment and is not compiled to machine code when the sketch is compiled.
It’s important to know that comments aren’t transferred to the Arduino board because there’s only so much space on there to store your projects. Now you know that writing long comments isn’t going to cost you any space on your board.
After the multiline comment, we see another type of comment; a single line comment. Anything after // on a single line is also ignored by the compiler and not transferred to your board. These are normally placed in reference to a single line of code to explain what’s happening, why it’s happening and/or what might be done to improve/modify the code in the future.
The setup() function
Next, we see the first function:
void setup() { // initialize digital pin LED_BUILTIN as an output.
  pinMode(LED_BUILTIN, OUTPUT);
}
A function is a set of code grouped together and given a name. Here we are seeing a function being ‘declared’. This means we’re writing what this function does. A bit further into this post you’ll see some functions being used that are already declared as they’re built in to the Arduino IDE.
The first keyword we see when this function is being declared is “void”. We don’t need to worry about what this is for yet, but, for now, just know that it is necessary.
The next thing we see is the name of the function and a couple of brackets, “setup()”.
setup() is a special function for Arduino. Any code in this function is executed by your Arduino board before your main code in the loop() function, and, it’s only run once.
The two brackets after the name of the function are present for every function, but, nothing is required between them for this function. Whenever you make your own functions in the future, you’ll use this space to bring values into your function. We’ll cover that in more detail when we look more closely at functions.
Finally, there’s an opening curly bracket “{” followed by a single line comment, a line of code and a closed curly bracket “}”. Anything between these curly brackets belongs to the setup() function.
So, when we say that setup() runs once each time you power up or reset your Arduino, we mean that the code between the curly brackets for the setup() function runs once.
We know that the comment is just for guidance and isn’t compiled, so let’s move onto the line of code that we see:
pinMode(LED_BUILTIN, OUTPUT);This may look a little familiar. When we first looked at the setup() function, we said it had the name of the function and a pair of brackets that can be used by functions to accept values.
pinMode is also a function. This function has already been set up within the Arduino language though, so you don’t even have to think about the code it runs when you use it.
The pinMode function expects two values (we call them arguments when we are passing them to a function). The first argument is the number of a pin. The second is used to configure the pin and can be either “OUTPUT”, “INPUT” or “INPUT_PULLUP”.
In this sketch, we see that the first argument provided isn’t actually a number, but instead is “LED_BUILTIN”. LED_BUILTIN is seen as a special value by the Arduino IDE. When your code is compiled, the IDE looks at what board you’ve said you’re using. The IDE will automatically replace the LED_BUILTIN text with the pin number of the board you’re using that’s attached to a built in LED. Pretty handy eh?!
We see that the pin is being configured as an output. This makes sense as we’re sending a signal out from that pin to the LED. The other side of the LED connects to a resistor and to ground. We’re not expecting any inputs on any of our pins.
The last thing we see after the bracketed arguments is a semicolon, “;”. This tells the compiler that it’s the end of that command. If we miss this out, we’ll see an error…
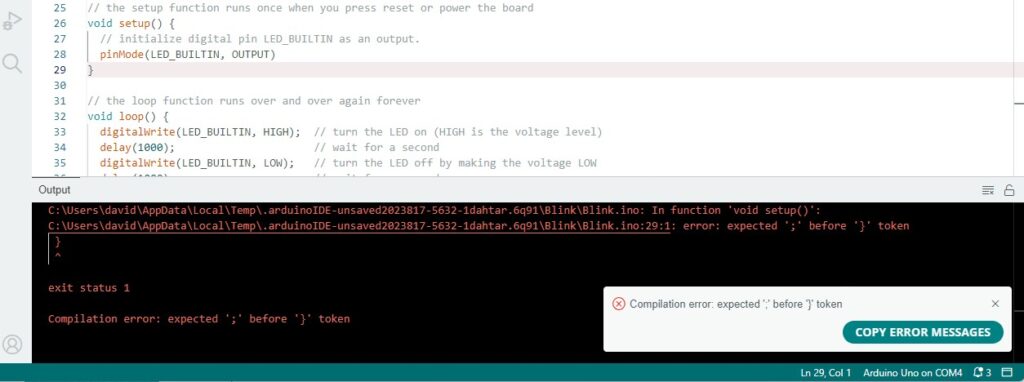
Missing semicolon error
Let’s see our first, deliberate at least, error. Let’s remove the above mentioned semicolon on line 28 and try to upload our code to the board. You’ll see this error:

At first glance, the error looks pretty technical and scary, but it’s actually very helpful. Let’s take a breath and break it down.
At first, you should notice that line 29 is highlighted in red by the IDE. This gives us a big clue as to where the problem is (although, this can sometimes be misleading!). Both the orange text and the white pop up error box state “Compilation error: expected ‘;’ before ‘}’ token. This might be beginning to make a bit more sense now. We understand what a compilation error is as we know our code needs to be compiled before it can be sent to our Arduino. We also know that we need a ‘;’ at the end of a command, so we know the kind of error we’re looking for. The red highlighted text then tells us where it is.
The loop() function
The final part of this sketch is the loop() function:
// the loop function runs over and over again forever
void loop() {
  digitalWrite(LED_BUILTIN, HIGH);  // turn the LED on (HIGH is the voltage level)
  delay(1000); // wait for a second
  digitalWrite(LED_BUILTIN, LOW);   // turn the LED off by making the voltage LOW
  delay(1000); // wait for a second
}
The loop() function runs after the setup() function has completed and will reun repeatedly until the Arduino is powered down.
You’ll recognise the pattern of a function being declared as it’s done in exactly the same way as the setup() function. However, where the setup() function had only one line of code, we see that this function has four lines of code between the curly brackets. Let’s look through them:
digitalWrite(LED_BUILTIN, HIGH); // turn the LED on (HIGH is the voltage level)digitalWrite() is another example of a function that’s built into the Arduino language, just like pinMode(). This function also expects us to pass it two arguments. The first is a pin number and the second is the value. In this example, we continue to use the “LED_BUILTIN” reference so that the Arduino IDE ensures we’re using our LED pin. On this line, we’re setting it to “HIGH”. This means we’re turning it on by sending 5V to it.
At the end of the function, you see the semicolon, as you’d expect. Finally, there’s a very helpful comment that explains what’s going on.
Next, we have a line of code that slows things down for us:
delay(1000); // wait for a seconddelay() is another function built in to the Arduino language. As the name suggests, it causes a delay in the code. It’s important here as we’re switching the LED on and off. If we never had a delay, it’d flash faster than our eyes could to detect!
The function only expects one argument and that’s the delay duration in milliseconds. 1000 milliseconds is one second.
While delay() is very handy to use here, it can be problematic in larger projects. This is because it stops all code from executing while the delay is taking place. Therefore, screens won’t update, buttons won’t work and anything else you’d like to happen may not. There are ways around this, but that’s for another post.
After the function, we see the semicolon and another useful comment.
The final two lines should now make sense:
digitalWrite(LED_BUILTIN, LOW); // turn the LED off by making the voltage LOW
delay(1000); // wait for a second
The only difference here is that we’re setting the “LED_BUILTIN” pin to LOW. This means we’re no longer sending power to the pin, so the LED will switch off.
Take the opportunity to review the function structure once again. you see the function name that’s being called, the arguments passed to the function in brackets and a semicolon to end the command.
Also take a look at the line comment. “//” followed by the comment means it’s not read by the compiler.
Learning summary
- Arduino uses a C++ based language that is compiled before being uploaded to the Arduino board.
- Anything inside “/*” and */”, or, after // on a line is a comment. Comments can be helpful but they’re not stored on your Arduino.
- Arduino runs your code from two special functions: setup() and loop().
- When declaring setup() and loop(), the keyword “void” is used before the function name.
- When declaring a function, all code that belongs to it is stored within a pair off curly brackets “{ }”.
- Functions can be setup to expect arguments to be passed to them, but setup() and loop() are not.
- The Arduino language has many functions built in, including pinMode(), digitalWrite() and delay().
- The setup() function runs once when the Arduino board is powered on or reset.
- The loop() function runs after the setup() function has completed and repeats until the Arduino board is turned off.
- pinMode is used to set a specific pin to a specific type (OUTPUT, INPUT or INPUT_PULLUP).
- digitalWrite is used to set a pin that’s configured as an OUTPUT to either LOW or HIGH.
- delay() is used to pause code execution for a set number of milliseconds.
Tinkering and learning
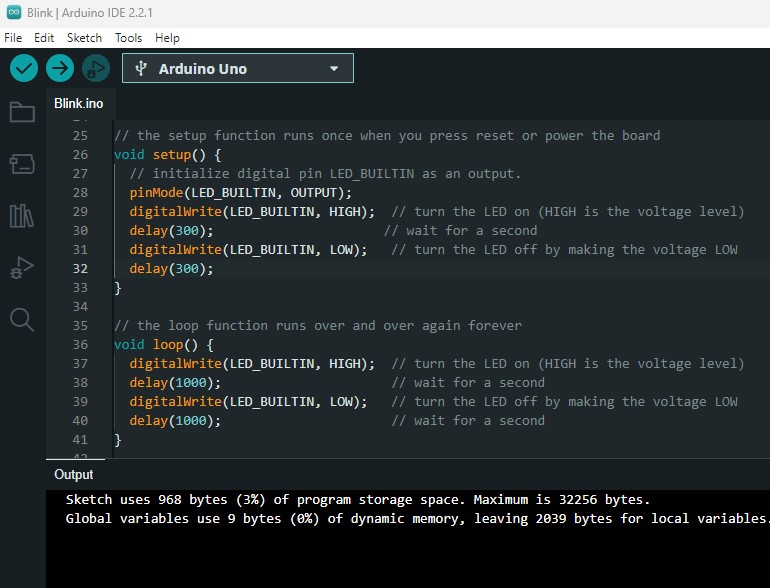
I hope that the above breakdown of the blink code will give you some confidence in understanding what’s happening when you send code to your board and what the code does. I strongly recommend that you tinker with this code and become familiar with it. Here are some little projects you can follow to embed your learning:
- Make the LED bling twice as slow.
- Make the light switch on for 500 milliseconds and then off for 500 milliseconds just once before the repeated blinking commences.
- Add a second sequence of blinking to the loop() function so that if blinks slow and then fast.
- Click File > New Sketch and, in the pop up window, write Blink. Try not to look at the blink example code (but it’s okay to do so if you get stuck).
Further Arduino learning
My nextarticles will help you continue your learning progress:
- Choosing your first Arduino
- How To Install, Set Up and Upload Code
- How to communicate with serial
- What variables are and how to use them
- How to use operators
I also recommend that you take a scroll through the tutorials on the official Arduino website
That’s all for now
If you found this post helpful, or, if there’s anything you’d like to see in future posts, please leave a comment and let me know. It’d also be really helpful if you could share the post with anybody who might find it interesting.
Thank you for being here!


