What are conditionals?
Conditionals are branches in your code. The check to see if a specific criteria is met and, if it is, a specified set of code will run. Without them, your code would always do the same thing when it runs. With them, you have control.
What conditional functions are available in Arduino?
Technically, you could argue that loop functions are, at least in part, conditional statements, but I’ll cover those separately. Those aside, we have ‘if’ (coupled with ‘else if’ and ‘else’) and ‘switch’ (coupled with ‘case’). Each of these are used with the relational operators we learned about here: How to use operators to execute different code depending on what the variable contains. In this post, you’ll learn about ‘if’, ‘else if’ and ‘else’.
If, else if and else
The if function can be used on its own. In such cases, the execution works like this:
if (expression1 is true) {code1}
In the above example, if the expression is true, code1 will execute. If it’s not, it won’t.
The if function can be used with else if, like this:
if(expression1 is true) {code1}
else if(expression2 is true) {code2}
else if(expression3 is true) {code3}
In the above example, if none of the expressions are true, none of the code samples will execute.
It’s important that the above example will run from top to bottom and stop when one expression is true. For example, if expression1 is true, expression2 and expression3 will not be tested, so neither code2 nor code3 will be executed.
The if function can also be used with else, like this:
if (expression1 is true) {code1}
else {code2}
In the above example, code2 will only execute if expression1 is not true.
Finally, the if statement can be used with both ‘else if’ and else, like this:
if(expression1 is true) {code1}
else if(expression2 is true) {code2}
else if(expression3 is true) {code3}
else {code4}
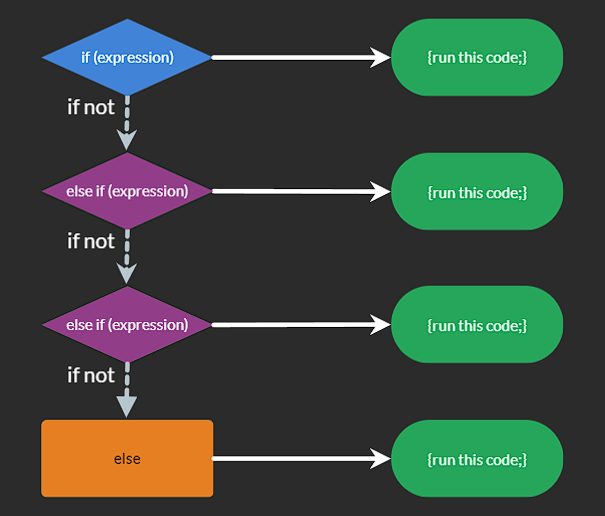
This can be seen in the flow chart below:

In the above example, if example1 is true, only code1 will execute, even if expression2 or expression3 are also true.
If expression1 is false, then expression2 will be tested. If that’s true, only code2 will execute.
If expression2 is also false, then expression3 will be tested. If that’s true, code3 will execute.
If none of the expressions are true, code4 will execute.
Only the code linked to the first true expression will execute and, the code linked to the final else will only exectue if none of the expressions are true.
Each expression can use different variables, they’re not required to be linked in any way. For example:
if(temperature is above 30) {set fan speed to fast}
else if (humidity is above 80) {set fan speed to medium)
else {turn fan off}
There’s no limit to the number of else ifs you can include, however, the switch function, discussed in my next post, may be more appropriate if you’re testing for multiple possibilities on the same variable.
Let’s see examples in action. You can either read through the code below and follow along. However, I recommend that you copy and paste it into the Arduino IDE, upload it and open the Serial Monitor tool to see the code in action.
int waitTime1(10000);
int waitTime2(6000);

void setup() {
  Serial.begin(9600);
}

void loop() {

  // I'll start by creating a couple of variables for testing later
  int variable1 = 1;
  int variable2 = 10;

  // This is to demonstrate that true is digitally represented as 1:
  Serial.println();
  Serial.println("*****START*****");
  Serial.println();
  delay(waitTime2);


  Serial.println("Let's try to print 'true' and see what happens...");
  delay(waitTime2);
  Serial.println(true);

  delay(waitTime1);

  Serial.println("Let's try to print 'false' and see what happens...");
  delay(waitTime2);
  Serial.println(false);
  delay(waitTime2);
  Serial.println("So, true is the same as 1 and false is the same as 0.");

  delay(waitTime1);
  Serial.println();

  Serial.println("Now let's see how 'if' works with true or false and 1 or 0:");

  delay(waitTime2);

  Serial.println("The following two if statements demonstrate that:");
  delay(waitTime2);
  Serial.println("A 'true' expression means the code will execute.");
  delay(waitTime2);
  Serial.println("A 'false' expression means the code will not execute.");
  delay(waitTime1);

  if(true){
    Serial.println("'true' code executed.");
  }

  if(false){
    Serial.println("'false' code executed.");
  }

  delay(waitTime1);

  Serial.println();
  Serial.println("The following two if statements demonstrate that:");
  delay(waitTime2);
  Serial.println("When an if statement expression equates to 1, the code is executed.");
  delay(waitTime2);
  Serial.println("When it equates to 0, the code is not executed.");
  delay(waitTime1);
  if(1){
    Serial.println("'1' code executed.");
  }

  if(0){
    Serial.println("'0' code executed.");
  }

  delay(waitTime1);
  Serial.println();


  Serial.println("Remember, relational operators will:");
  delay(waitTime2);
  Serial.println("Return 1 if the outcome is true.");
  delay(waitTime2);
  Serial.println("Return 0 if the outcome is false.");
  Serial.println();

  delay(waitTime1);

  Serial.println("5 is always equal to 5, so if we ask 5 == 5 (5 is equal to 5?), we should get true (1):");

  delay(waitTime1);

  Serial.println(5==5);

  delay(waitTime1);
  Serial.println();


  Serial.println("Knowing this, we can directly ask these questions inside our if statement:");

  delay(waitTime2);

  if(5==5){
    Serial.println("5 is equal to 5.");
  }

  if(5==6){
    Serial.println("5 is equal to 6.");
  }

  delay(waitTime1);
  Serial.println();

  Serial.println("Remember:");
  delay(waitTime2);
  Serial.print("variable1 is ");
  Serial.println(variable1);
  delay(waitTime2);
  Serial.print("variable2 is ");
  Serial.println(variable2);
  delay(waitTime2);

  Serial.println("Now, let's test our variables to see if they're greater than 5:");

  delay(waitTime2);

  if(variable1 > 5){
    Serial.println("variable1 is greater than 5");
  }

  if(variable2 > 5){
    Serial.println("variable2 is greater than 5");
  }


  delay(waitTime1);
  Serial.println();


  Serial.println("Let's look at 'else':");
  delay(waitTime2);
  Serial.println("The following code will print 'Greater than or equal to 5' if variable1 is >=5.");
  delay(waitTime2);
  Serial.println("If it's not, the 'else' code will execute and 'Less than 5' will be printed:");
  delay(waitTime2);
  if(variable1 >= 5){
    Serial.println("Greater than or equal to 5");
  }
  else{
    Serial.println("Less than 5");
  }


  delay(waitTime1);
  Serial.println();


  Serial.println("Now let's look at an 'else if' example:");
  delay(waitTime2);
  Serial.println("We'll cheack, one number at a time, to see if we can match variable2:");
  delay(waitTime2);

  if(variable2 == 9){
    Serial.println("variable2 is 9");
  }
  else if(variable2 == 10){
    Serial.println("variable2 is 10");
  }
  else if(variable2 == 11){
    Serial.println("variable2 is 11");
  }
  else{
    Serial.println("variable2 is neither 9, 10 or 11");
  }


  delay(waitTime1);
  Serial.println();


  Serial.println("Now for one final 'else if' example.");
  delay(waitTime2);
  Serial.println("This demonstrates how no further 'else if' expressions are checked once a true expression has been found:");
  delay(waitTime2);

  if(true){
    Serial.println("The first expression is true");
  }
  else if(true){
    Serial.println("The second expression is true");
  }
  else if(true){
    Serial.println("The third expression is true");
  }
  else{
    Serial.println("No expression was true");
  }


  delay(waitTime1);
  Serial.println();
  Serial.println("*****END*****");
}
Further learning
If you haven’t already read through my previous Arduino posts, you may be interested in these:
- Choosing your first Arduino
- How To Install, Set Up and Upload Code
- How to code your Arduino
- How to communicate with serial
- What variables are and how to use them
- How to use operators
Next, we’ll look at an alternative to the if function in switch and case. After that, we’ll move on to loops.
Thank you for reading. If this post helped you, if you think it could be improved, or if there’s a topic you’d like to learn more about, please leave a comment below.


