What are the switch, case and default keywords?
Just like the if, else if and else keywords we saw in the previous article, the switch and case keywrods are used to branch code along routes that depend on the value of a variable. To follow this tutorial, it will help for you to be familiar with how to use operators.
Switch and Case
Switch and case are always used together, usually with the keyword break. They work in the following format:
switch(variable) {
case 1:
code1 (run this code if the variable is equal to 1)
break
case 2:
code2 (run this code if the variable is equal to 2)
break
case 3:
code3 (run this code if the variable is equal to 3)
break
default:
default code (run this code if none of the cases match)
break
}
In the above example, we start the switch, case, default section of code with the switch keyword.
The switch keyword identifies the variable we are testing. Let’s follow along with an integer variable called count. Let’s say count is equal to 2.
Next, we tell the arduino what to do in different scenarios. Note that the 1 in case 1 is saying “if the variable is 1”. It’s not necessarily case number 1. We could say case 200 to check if the variable is 200.
So, if you’re still following the example I started above, in the first case line, we’re be checking if count is equal to 1. If it is equal to 1, we run all of the code below that line until we say break. Of course, we know count is 2 and, at this point, the arduino knows that it’s not 1 and so doesn’t run the code.
Next, we have case 2. If you see the pattern, you’ll know that we’re now checking if count is equeal to 2. It is, so we run the code below until we say break. As we’ve found a match, we don’t check any other cases for a match.
If we checked all of our cases and didn’t find a match, as code writers, we have two options. We can leave the code there and do nothing as we haven’t found a match. Alternatively, we can set a default case. The default code only runs if there is not match to any other cases. In place of the word case, we use the word default.
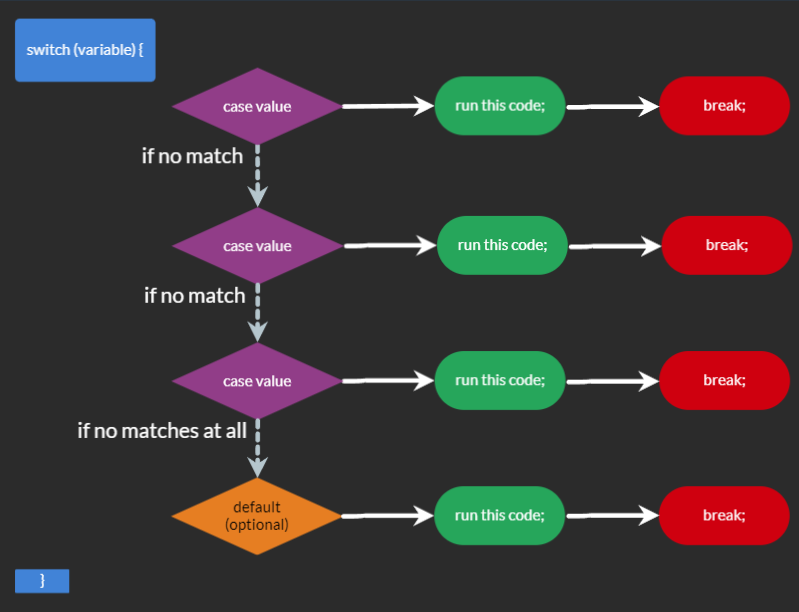
The flowchart below shows more clearly how switch case and default work

Let’s see this in code we can upload to our Arduinos and play with.
void setup() {
  Serial.begin(9600);
}

void loop() {

  // Let's create a test variable. You can come back and change this to better understand.
  int count = 2;

  // First, we set up a switch block by using the switch() function and selecting a variable to test.
  switch(count){
    // Now we set up our case blocks.
    // We can use as many as we need, but each one must end with a break; command.
    case 0:
      // In each case block we can include as many lines of code as required.
      // In these examples, we've used 0, 1, 2 and default.
      // We could have used 10, 14 and 200 if that suits our use case.
      Serial.println("Case 0: count must be 0.");
      Serial.println("No further checks necessary.");
      break;
    case 1:
      Serial.println("Case 1: count must be 1.");
      Serial.println("No further checks necessary.");
      break;
    case 2:
      Serial.println("Case 2: count must be 2.");
      Serial.println("No further checks necessary.");
      break;
    default:
      // The default case is used as a catch-all.
      // If none of the above cases are matched, the default case code is executed.
      // The default case is optional and can be omitted if you so wish.
      Serial.println("There are no matching cases.");
      Serial.println("This is the default code");
      break;
}
Why use switch, case and default?
The most important thing to note is that we really don’t have to use switch, case and default. For each use of it, an if, else if and else example could be used. However, there are some benefits to using switch, case and default:
- Code that cleaner and easier to read
- As can be seen in the above example, the code is compact and simple to read.
- Code that’s easier to write
- Once you’re familiar with it, writing “case 2” is easier than writing “else if (count==2){“.
Further learning
The official Arduino reference for switch…case can be found here: https://www.arduino.cc/reference/en/language/structure/control-structure/switchcase/
If you haven’t already read through my previous Arduino posts, you may be interested in these:
- Choosing your first Arduino
- How To Install, Set Up and Upload Code
- How to code your Arduino
- How to communicate with serial
- What variables are and how to use them
- How to use operators
- How to use if, else if, else
Next in this series we’ll be looking at loops to repeatedly run some of our code without writing it again and again.
Thank you for reading. If this post helped you, if you think it could be improved, or if there’s a topic you’d like to learn more about, please leave a comment below.


